Fundraising Page Tutorial

Our Personal Fundraising Pages (PFPs) are an easy way for you or your friends to get your fundraising efforts off the ground.

We've created a 5 step tutorial for creating your fundraiser using our Personal Fundraising Pages (PFPs) that will help you set up your fundraiser and get your your campaign off the ground. You can refer back to this tutorial at any time to help you complete your fundraising page.

With our PFPs, creating your own fundraiser can now be as easy as A-B-C.


  • Step 1. Creating your account


    Step 1. Select the Click Here button under "Create a Fundraiser" page option.

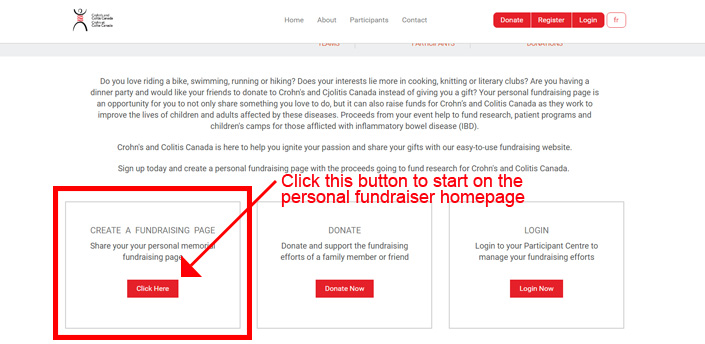
    Select the "Click Here" button under the "Create A Fundraising Page" option on the site homepage.

    Step 2. Register as a new user or returning participant


    Select "Create an Account" under the New User option, or login as a returning participant

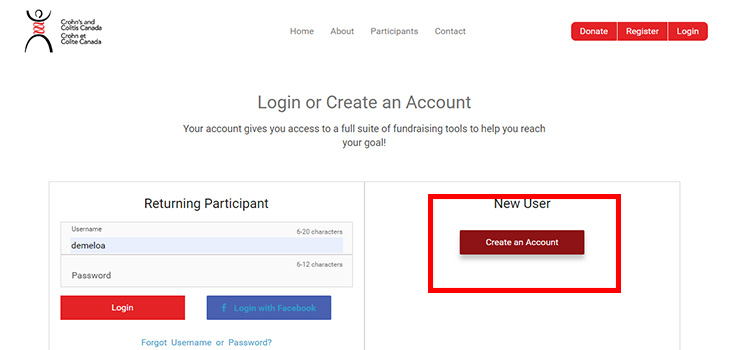
    Click the "Create an Account" under the New User option or log in as a returning participant. If you wish to return to the Participant Centre, click the login button at the top right and sign-in using the Username and Password emailed to you when your account was created.

    Step 3. Review the waiver and continue


    Accept the waiver and continue

    Tick the "I accept" waiver box and select "Continue".

    Step 4. Choose to manually enter your information or use Facebook to automatically complete the form


    Use your facebook to fill in your account information or complete this step manually

    You may choose to click the Facebook button to have the module link to your Facebook account and automatically enter your information, or you can manually complete the registration portion of creating your Personal Fundraising Page (PFP).

    Step 5. Registration acknowledgement and email sent with password and links


    You are now registered. You can click the "Start Fundraising" button to continue.

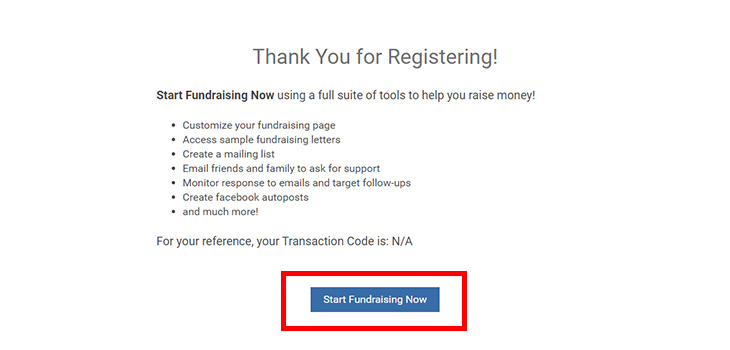
    If you have completed all the fields and clicked the red "Continue" button, you should now be registered for your PFP and see the screen above.

    A confirmation email will be sent to the email you used to register. PLEASE SAVE THIS EMAIL. It contains your username, password, and the link to your PFP. 

    You may decide at a later date to return to your page and send thank you letters or other emails from the Participant Centre so saving this confirmation email will help you navigate to your page. You can also click the red "LOGIN" button at the top right to use your username and password to return to the Participant Centre at any time.

    You can now click on the blue "Start Fundraising Now" button that will take you to the participant centre where you can personalize your fundraising page and send your contacts an email asking for their support. 

    Step 6. Take the the 45 second tour


    Take a 45 second tour image

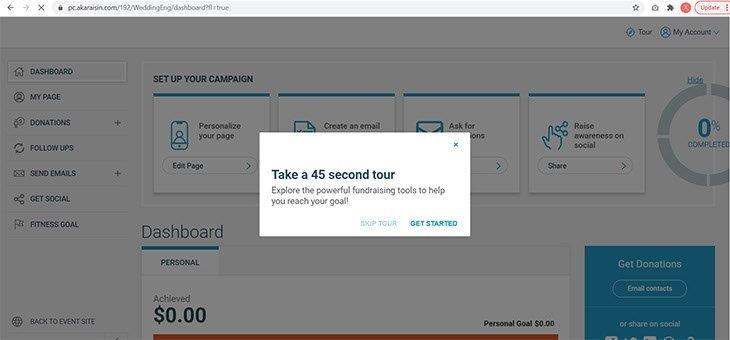
    Once you click on the blue "Start Fundrasing Now" button, you will be taken to the Particpant Centre. You will be prompted to take the 45 second tour of the participant centre that will walk you through how to set up a sussessful fundraising campaign all on your own. You can return back to the Participant Centre dashboard by clicking on the icon of a house ( House icon ) at the top left at any time. You will notice that the circle graph on the top right of the dashboard will colour in its four sections as you complete the main tasks needed to create your personal fundraising page and ensure a successful fundraising campaign.


  • Step 1. Personalize your fundrasing page with images and text


    Click the "Edit Page" button on the left menu or click the link under "Personalize your Page" box at the top. You should see the following. Click "Edit Page" to begin customizing your page.

    Start by clicking Edit Page image

    On your personal page, you can add an image of yourself or a video. Additionally, you can edit the text to reflect your personality, your story or why you are hoping to raise money for research and patient programs.

    Editing your personal page to make it your own

    When you are finished, simply click on the home icon ( House icon ) at the top of your browser to return to the Participant Centre's Dashboard.

    Each time you complete one of the 4 main steps, the circle graph on the top right will indicate how far you are away from completing your fundraising page.

    An icon showing the Gutsy Walk Dashboard and that you are 25%25 done


  • 1. You can decide from different options on how to create  your list


    Preparing your email list using the Address Book

    Under "Set up your campaign" area at top, Click the "Import Contacts" link under the "Create an email list" button.

    A pop-up will display the various contact programs you can select from. You can select what program you would like to use to create a list of selections that you will later send out your friends and family to let them know about your fundraising page.

    Please Note: Your PFP will not automatically send emails to everyone in your address book. You will need to select individuals from the list that you wish to contact before ANY email is sent. [See next step]

    A pop-up will display the various contact programs you can select from. You can select what program you would like to use to create a list of selections that you will later send out your friends and family to let them know about your fundraising page.

    select those people in your list who you would like to contact and notify about your fundraiser. click the green "get connections" button. Close the popup and return back to your dashboard by clicking on the button on the top left. Your graph on the top right should now show that you're 50% done.

    Your graph should now show that you're 50%25 done.
     

    2. Now you will want to tailor an email to send out to your contacts
     

    From your contact list, select who you want to reach out to in order to fundraise

    At the top of the dashboard click on the "send email" link in the third box, "ask for donations." (see above)

    Graphic showing an arrow toclick to add contacts to your message to send out to

    Tick the blue box to add the recipients you specified as possible donors in the last step when you added contact from your address book. The email you are creating will notify these recipients of your fundraiser and Personal fundraising page (see example above).

    Next, you can tailor the message you would like to send out and add details about what type of fundraiser you are creating and your story or reason for creating a fundraiser. Preview your message to see how it will look and review it before you send it to your contacts.

    Please note, any content within brackets is automatically inserted by the website to help you with your fundraiser. Please be wary of deleting this text as you may delete the link to your fundraising page [%Link-MyHomePage%] or other information that will be helpful in your fundraising efforts. 

    Click send to have your message emailed to the contacts you specified. Now you can return back to your dashboard (button on top left). Your graph on the right should now show that you are 75% done.

    A graphic of the Gutsy Walk dashboard showing that you are 75%25 done


  • While in the participant centre, click on the "share" link in the 4th box at the top labelled "Raise Awareness on Social." You will be prompted to select the social media platform of your choice (see below). A pop-up will display that will allow you to tailor a message about your fundraiser and it will include a link to your fundraising page so that your friends on social media channels will be able to see that you're hosting a fundraiser and help you raise funds by contributing or sharing your post with others on their social media channels.


    While in the participant centre, click on the "share" link in the 4th box at the top labelled "Raise Awareness on Social." You will be prompted to select the social media platform of your choice (see below). A pop-up will display that will allow you to tailor a message about your fundraiser and it will include a link to your fundraising page so that your friends on social media channels will be able to see that you're hosting a fundraiser and help you raise funds by contributing or sharing your post with others on their social media channels.

    You just completed your Personal Fundraisiing page. the graph on the top right should now show 100%.

    4th stage complete graphic

    You should receive an email shortly indicating your login information and the link to your personal page. (DO NOT DELETE THIS EMAIL). You can copy/paste this login info or save this email so that it is easy to refer back to later.


  • The Follow Ups Tab on the left menu acts as a "To-Do" list. It displays a list of contacts that you contacted by email and allows you to see when the emails were sent, if they were opened, and if there was a reply. This helps you to keep up with your fundraising effort so you can decide if a second email is needed or if you want to reach out to more people in your contact list to grow your fundraising effort.

  • Yes, you can now stream video through your personal fundraising page.

    Log into the fundraising website. Click on the "Stream Video" button in the participant centre.

    Live streaming button in Participant Centre

    You will need to have created an account on Twitch (downloaded the app), Facebook or Youtube. (We suggest if you are planning on walking or travelling while streaming, that you download Twitch, Facebook or Youtube and stream from your mobile device.)

    You must decide on a  streaming option (Twitch, Facebook Live or Youtube Live).

    For Twitch, enter your Twitch Username

    Streaming video using Twitch for your personal fundraiser

    For Facebook or Youtube streaming, enter the streaming live URL.

    Streaming video using Facebook Live or Youtube live for your personal fundraiser

    For Gamers

    Adding a donate button or donation progress bar on your Video feed. (Note, for regular users, this is not necessary as it appears on your Personal Fundraising Page.

    Twitch Overlays


    Twitch Overlays

    Once a participant clicks on the  "Live Streaming button", in addition to displaying the field where you enter in either your Username or Streaming URL, gamers also have the ability to download a donation button and/or a live progress bar to add to their Twitch using overlays and widgets. These additional items primarily used by gamers during video streaming can be accessed on the  right side of the participant centre after the "Streaming Live" button is activated.

    Adding a donate button or fundraising progress bar will require streaming through an additional program you must download; Twitch Studio Beta. You must add your overlays and widgets into this third party platform to use either the download button or progress button from the participant centre in your stream. Details on how to add these overlays and widgets can be found on the Twitch site here.

    You can access an introduction to Twitch Studio Beta here.

  • Canada has among the highest incidence rates of Crohn's and colitis in the world.
  • 1 in 140 Canadians lives with Crohn’s or colitis.
  • Families new to Canada are developing these diseases for the first time.
  • Incidence of Crohn’s in Canadian kids under 10 has doubled since 1995.
  • People are most commonly diagnosed before age 30.

Other Areas of Interest